behind the code

coding affection

Customizing CKEditor for custom templates

CKEdtior is one of the best HTML text editor. Mostly used in CMS (Content Management System) for web content creation.

How to add CKEditor in web page:

Try the following easy steps to complete the task.

  1. Open New Project [File->New->Web Site-> ASP.NET Empty Web Site]
  2. Name the Project as you like, I named it "CkEditorDemo"
  3. Download the attached Zip file (CKEDditor.zip) from here and extract.
  4. You can also download CKEditor for ASP.NET
  5. You will find a bin folder when you extract the CKEditor.zip
  6. Go to the Solution explorer,
  7. Add ckeditor folder in your project.
  8. Add reference to CKEditor.NET.dll.
  9. Add new web form in project.
  10. Open designer then go to toolbox and drag drop CKEditor control on web form.
  11. If control is not present then right click in Toolbox and select Choose Items.
15. Click Browse and select CKEditor.NET.dll from bin folder.
16. It will add CKEditor control in toolbox then simply drag and drop it to added web form.
17. Open web form in browser.
18. It will show editor control in page as shown below.


Where is template option?
Click on template icons near printer icon and it will open select template window as shown below.

From where it comes or loaded:
These templates are loaded from config file i.e. js file which can found in ckeditor=>plugins=>templates=>templates=>default.js

Customization:
Step 1:
Just open default.js file which contain title, image, description, and html to be load when template applied as shown below.
CKEDITOR.addTemplates('default', {
    imagesPath: CKEDITOR.getUrl(CKEDITOR.plugins.getPath('templates') + 'templates/images/'),
    templates:
        [
            { title: 'Image and Title', image: 'template1.gif', description: 'One main image with a title and text that surround the image.', html: '<h3><img style="margin-right: 10px" height="100" width="100" align="left"/>Type the title here</h3><p>Type the text here</p>' },
            { title: 'Strange Template', image: 'template2.gif', description: 'A template that defines two colums, each one with a title, and some text.', html: '<table cellspacing="0" cellpadding="0" style="width:100%" border="0"><tr><td style="width:50%"><h3>Title 1</h3></td><td></td><td style="width:50%"><h3>Title 2</h3></td></tr><tr><td>Text 1</td><td></td><td>Text 2</td></tr></table><p>More text goes here.</p>' },
            { title: 'Text and Table', image: 'template3.gif', description: 'A title with some text and a table.', html: '<div style="width: 80%"><h3>Title goes here</h3><table style="width:150px;float: right" cellspacing="0" cellpadding="0" border="1"><caption style="border:solid 1px black"><strong>Table title</strong></caption></tr><tr><td>&nbsp;</td><td>&nbsp;</td><td>&nbsp;</td></tr><tr><td>&nbsp;</td><td>&nbsp;</td><td>&nbsp;</td></tr><tr><td>&nbsp;</td><td>&nbsp;</td><td>&nbsp;</td></tr></table><p>Type the text here</p></div>' }
        ]
});
templates is nothing but array of objects with title, image, description and html as members.

Step 2:
Lets add new custom template in above collection. for that I have Ecommerce Product Display html code which is in bootstrap 3.1.0. 
Add new entry in above array with title and description you want, for image just use old image as of now, for html content copy html content as it is and it will look as shown below.

{ title: 'My Custom Template', image: 'template3.gif', description: 'Custom template for product listing', html: '<div class="col-md-2 column productbox"><img src="http://placehold.it/460x250/e67e22/ffffff&text=HTML5" class="img-responsive"><div class="producttitle">Product 2</div><div class="productprice"><div class="pull-right"><a href="#" class="btn btn-danger btn-sm" role="button">BUY</a></div><div class="pricetext">£8.95</div></div></div><div class="col-md-2 column productbox"><img src="http://placehold.it/460x250/e67e22/ffffff&text=HTML5" class="img-responsive"><div class="producttitle">Product 2</div><div class="productprice"><div class="pull-right"><a href="#" class="btn btn-danger btn-sm" role="button">BUY</a></div><div class="pricetext">£8.95</div></div></div><div class="col-md-2 column productbox"><img src="http://placehold.it/460x250/e67e22/ffffff&text=HTML5" class="img-responsive"><div class="producttitle">Product 3</div><div class="productprice"><div class="pull-right"><a href="#" class="btn btn-danger btn-sm" role="button">BUY</a></div><div class="pricetext">£8.95</div></div></div><div class="col-md-2 column productbox"><img src="http://placehold.it/460x250/e67e22/ffffff&text=HTML5" class="img-responsive"><div class="producttitle">Product 4</div><div class="productprice"><div class="pull-right"><a href="#" class="btn btn-danger btn-sm" role="button">BUY</a></div><div class="pricetext">£8.95</div></div></div>' }
save default.js file.

Step 3:
Now as my html has some css properties which needs to be added in CKEditor config file. for that add new folder to ckeditor directory and add required css file in it.
 
Now we need to include this css to ckeditor config file and for that open config.js from ckeditor directory and update as shown below.
CKEDITOR.editorConfig = function( config )
{
// Define changes to default configuration here. For example:
// config.language = 'fr';
    // config.uiColor = '#AADC6E';
    config.contentsCss = '/customcss/product.css';   
};
Now load page which contain ckeditor control and you will find new template get added in the list at last position.
Click on created template to apply it.

oops something went wrong, it is not expected output. we need to add bootstrap css file to load it properly so lets add bootstrap css  in config.js file.

CKEDITOR.editorConfig = function( config )
{
// Define changes to default configuration here. For example:
// config.language = 'fr';
    // config.uiColor = '#AADC6E';
    config.contentsCss = '/customcss/product.css';
    config.contentsCss = '//netdna.bootstrapcdn.com/bootstrap/3.1.0/css/bootstrap.min.css';
};
As you can see I have added it through bootstrap cdn link.

Now load page again and check.

You don't need to add this css, if you are going to show this content to the page having bootstrap css already included.
This is how we can create our own templates with help of ckeditor.

How to identify DLL is 32 bit, Any CPU or 64 bit

What if you have bunch of .net assemblies and you need to identify which assembly is x86, Any CPU and which is x64?

Answer is CorFlags tool provided by .Net Framework SDK.

Before using it lets create simple assembly with .net code.

Step 1:

Add new class library project 


I have added just two simple methods, one for adding two numbers and second one for number subtraction.


Step 2:
Now make different configurations with Configuration Manager, simply got o Build => Configuration Manager.


Add new platforms if not available from dropdown list.


Step 3:
Now you are ready to make assembly work with x64, x86 and Any CPU.
Then goto BUILD => Configuration Manager and change the platform as per requirement.


Step 4:
Now to identify assembly i'm going name assembly for each platform. to do so just go to Application tab above Build tab and give name to your assembly.


Build project then goto bin=>x86=>debug and you will find assesmbly with name CorFlagsTest_assembly1.dll.

Step 5:
Repeat above two steps i.e. step 3 and 4 for x64 and Any CPU platform. 
at end We have below assemblies generated.


copy each generated assembly in one folder.

Step 6:
now for corflags goto All Programs=> Microsoft Visual Studio 2008/2010/2012 => Visual Studio Tools=> Open Developer Command Prompt with admin rights. then follow below commands.
1. C:\Program Files (x86)\Microsoft Visual Studio 10.0>cd VC#
2. C:\Program Files (x86)\Microsoft Visual Studio 10.0\VC#>corflags E:\corflags\Cor
FlagsTest_assembly1.dll
Microsoft (R) .NET Framework CorFlags Conversion Tool.  Version  4.0.30319.1
Copyright (c) Microsoft Corporation.  All rights reserved.
Assembly1:

Version                 : v4.0.30319
CLR Header         : 2.5
PE                        : PE32
CorFlags              : 3
ILONLY                : 1
32BIT                   : 1
Signed                 : 0

C:\Program Files (x86)\Microsoft Visual Studio 10.0\VC#>
Now compare above result with below table to identify what type of assembly this is.
  • AnyCPU: PE = PE32, 32BIT = 0, and ILONLY = 1
  • x86: PE = PE32 and 32BIT = 1
  • x64: PE = PE32+ and 32BIT=0
for assembly1 result shows PE=PE32, 32BIT=1 AND ILONLY=1 so as per above table this assembly is x86

Assembly2:
C:\Program Files (x86)\Microsoft Visual Studio 10.0\VC#>corflags E:\corflags\CorFlagsTest_assembly2.dll
Microsoft (R) .NET Framework CorFlags Conversion Tool.  Version  4.0.30319.1
Copyright (c) Microsoft Corporation.  All rights reserved.

Version               : v4.0.30319
CLR Header        : 2.5
PE                        : PE32+
CorFlags             : 1
ILONLY               : 1
32BIT                  : 0
Signed                : 0

C:\Program Files (x86)\Microsoft Visual Studio 10.0\VC#>
for assembly2 result shows PE=PE32+, 32BIT=0 AND ILONLY=1 so as per above table this assembly is x64
Assembly3:
C:\Program Files (x86)\Microsoft Visual Studio 10.0\VC#>corflags E:\corflags\CorFlagsTest_assembly3.dll
Microsoft (R) .NET Framework CorFlags Conversion Tool.  Version  4.0.30319.1
Copyright (c) Microsoft Corporation.  All rights reserved.

Version           : v4.0.30319
CLR Header    : 2.5
PE                    : PE32
CorFlags         : 1
ILONLY            : 1
32BIT               : 0
Signed             : 0

C:\Program Files (x86)\Microsoft Visual Studio 10.0\VC#>
for assembly3 result shows PE=PE32, 32BIT=0 AND ILONLY=1 so as per above table this assembly is Any CPU.
So with corflags we can identify .net assembly platform with just one command.

Making image map interactive with jQuery ImageMapster Part-1

Image maps are useful for making image part selectable or clickable, but we can make it more interactive with help one jQuery plugin called ImageMapster

Lets create simple demo page with ImageMapster plugin.

Step 1:

Download ImageMapster jQuery plugin and add it on web page.

Step 2:

Add image, for demo purpose I'm going to use floor plan image.

Step 3:

Now create image map, we can create image map with below tools.

3.1 Dreamweaver :

Open created html page in Dreamweaver and goto image properties  


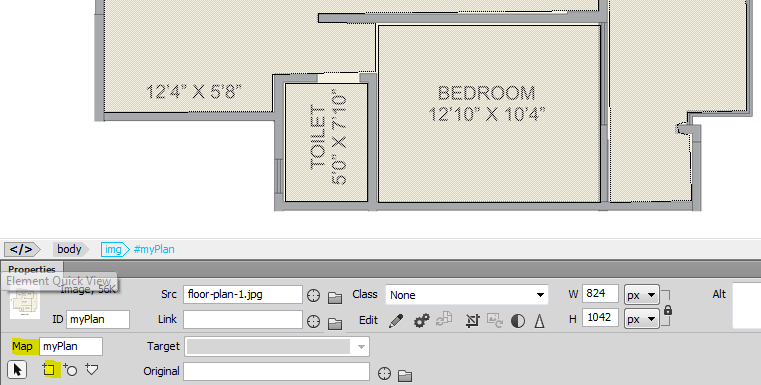
Create rectangle, circle and polygon hot spots as per your requirements.
Html code after adding image map is shown below.

<body>
<img src="floor-plan-1.jpg" width="824" height="1042" id="myPlan" usemap="#myPlan">
<map name="myPlan">
  <area shape="rect" data-key="BED" coords="430,233,631,433" href="#" alt="">
  <area shape="rect" data-key="TOI" coords="277,711,360,830" href="#" alt="">
  <area shape="rect" data-key="KIT" coords="370,653,593,831" href="#" alt="">
  <area shape="rect" data-key="BAT" coords="335,379,431,430" href="#" alt="">
  <area shape="poly" data-key="LIV" coords="96,738,96,447,589,446,590,638,310,641,310,650,367,651,367,699,264,702,264,739,96,740" href="#" alt="">
  <area shape="poly" data-key="UTL" coords="643,310,736,310,738,738,679,740,679,749,669,752,670,760,681,763,683,828,602,830,600,446,641,446,644,309" href="#" alt="">
  <area shape="rect" data-key="KIT" coords="189,232,326,437" href="#">
  <area shape="rect" data-key="KIT" coords="336,234,419,370" href="#">
  <area shape="rect" data-key="UTL" coords="190,162,330,225" href="#">
</map>
</body> 
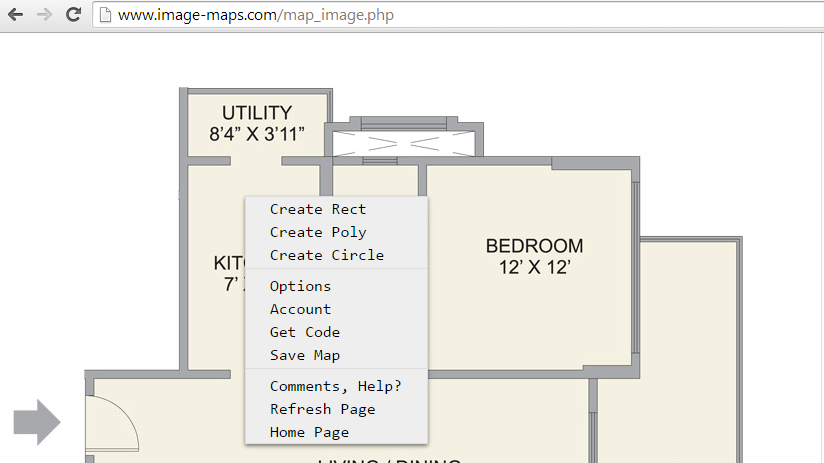
3.2 Online tools like: http://www.image-maps.com/ or http://www.maschek.hu/imagemap/imgmap
simply upload your image => draw image map as you want => get html code.


or


Step 4:
As we have already added jQuery and ImageMapster plugins to page, now lets initialize image map with below code.

 $(document).ready(function () {           
            $('#myPlan').mapster({
                showToolTip: true,
                noHrefIsMask: false,
                fillOpacity: 0.7,
                strokeWidth: 2,
                stroke: true,
                strokeColor: 'ff0000',
                mapKey: 'data-key',
                singleSelect: true,
});       
 });
Output :


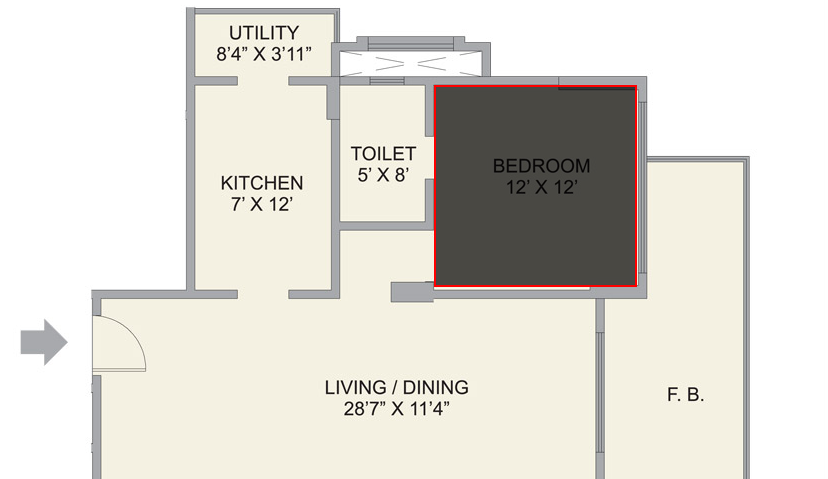
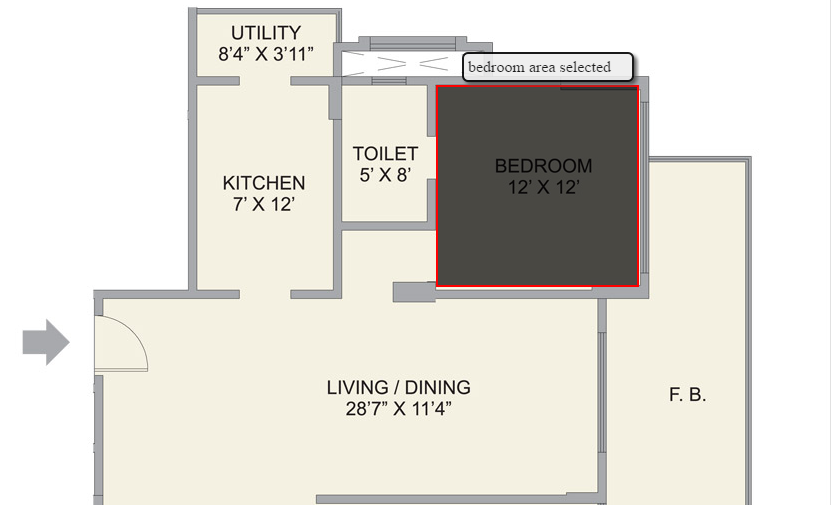
You can see individual area now select-able and highlighted with block color, also border is highlighted with stroke effect.

Now lets add tool tip on hover over all sections, for that we need to add data attribute in each image area like shown below.

<area shape="rect" data-key="BED" coords="430,233,631,433" href="#" alt="">
<area shape="rect" data-key="TOI" coords="277,711,360,830" href="#" alt="">
Here data-key are applied i.e BED for Bedroom and TOI for Toilet section you can add any key as you want.
Now initialize tool tips with below code.

<script type="text/javascript">

        $(document).ready(function () {          
         
            $('#myPlan').mapster({
                showToolTip: true,
                noHrefIsMask: false,
                fillOpacity: 0.7,
                strokeWidth: 2,
                stroke: true,
                strokeColor: 'ff0000',
                mapKey: 'data-key',
                singleSelect: true,
                areas: [
                    {
                        key: 'BED',
                        toolTip: 'bedroom area selected'

                    },
                    {
                        key: 'TOI',
                        toolTip: 'this is toilet'
                    },
                    {
                        key: 'KIT',
                        toolTip: 'this is kitchen'
                    },
                    {
                        key: 'BAT',
                        toolTip: 'this is bathroom'
                    },
                    {
                        key: 'LIV',
                        toolTip: 'this is living room'
                    },
                    {
                        key: 'UTL',
                        toolTip: 'this is utility room'
                    }
                ]
            });

        });
    </script>
in array of areas I have added key names and tool tip to be shown.
Output with tool tips:


on each area hover tooltip is shown. for more options visit ImageMapster documentation.
you can combine other tool tip plugins with this like tooltipster or poshy tip.